Pro Tips: Color Your Tail With Perl
We ran into a situation today where our JEE server was logging everything twice. Sadly, this meant that errors and warnings were logged as INFO and were missed.
2011-03-22 11:40:40,884 INFO [STDOUT] (main) 11:40:40,884 WARN [ProcessRoles] Could NOT find role XXXX
Since we watched the logs most often using the tail command, the quick and dirty solution was to have tail output lines containing WARN/ERROR/SEVERE in different colors that would stand out as the scrolled past. The bash/perl script below is the fruit of my hacking. Suggestions for improvements welcome.
t() {
tail -100f $1 | perl -pe 's/^.*SEVERE.*$/\e[1;37;45m$&\e[0m/g' | perl -pe 's/^.*ERROR.*$/\e[1;37;41m$&\e[0m/g' | perl -pe 's/^.*WARN.*$/\e[1;33;40m$&\e[0m/g'
}
Java 6 Scripting is no js.jar

QUnit-CLI riding a Dog
Today I wanted to put together a QUnit-CLI example that leveraged Java 6’s included scripting features. Seeing as the Java 6 JDK includes a recent version of Rhino as its primary JavaScript engine, I thought this would be a piece of cake. Wrong.
To the javax.script package’s credit, Creating a new scripting engine and evaluating some script code is dead simple. Example below from Oracle’s own pages…
import javax.script.*;

public class EvalFile {
  public static void main(String[] args) throws Exception {
    // create a script engine manager
    ScriptEngineManager factory = new ScriptEngineManager();

    // create JavaScript engine
    ScriptEngine engine = factory.getEngineByName("JavaScript");

    // evaluate JavaScript code from given file - specified by first argument
    engine.eval(new java.io.FileReader(args[0]));
  }
}
The trouble came into play when I ran QUnit-CLI ‘s Rhino based suite.js file. Ka-blew-ey!
Exception in thread "main" javax.script.ScriptException:
    sun.org.mozilla.javascript.internal.EcmaError:
    ReferenceError: "load" is not defined. (#1) in  at line number 1
  at com.sun.script.javascript.RhinoScriptEngine.eval(RhinoScriptEngine.java:110)
  at javax.script.AbstractScriptEngine.eval(AbstractScriptEngine.java:232)
  at Java6RhinoRunner.load(Java6RhinoRunner.java:29)
  at Java6RhinoRunner.main(Java6RhinoRunner.java:14)
It turns out that scripts running from in a Rhino Shell environment have access to extra functions that are not directly provided when executing embedded from Java. The top-level “load” function which is used to load additional JavaScript files from the Rhino Shell is not directly available when running from the scripting engine.
It turns out, I am not the only one with this problem. My solution was to bind an additional object with a Java-based “load” function and add a new top-level “load” function to the JavaScript scope that invokes the Java code.
import javax.script.*;
import java.io.*;

public class Java6RhinoRunner {
  public static void main(String[] args) throws ScriptException {
    new Java6RhinoRunner().load(args[0]);
  }

  private final ScriptEngine engine;

  public Java6RhinoRunner() throws ScriptException {
    ScriptEngineManager factory = new ScriptEngineManager();
    this.engine = factory.getEngineByName("JavaScript");

    this.engine.put("Java6RhinoRunner", this);
    this.engine.eval("function load(filename) { Java6RhinoRunner.load(filename); }");
  }

  public void load(String filename) throws ScriptException {
    try {
      this.engine.eval(new FileReader(filename));
    }
    catch(FileNotFoundException e) {
      throw new RuntimeException("Error loading javascript file: " + filename, e);
    }
  }
}
To make matters worse, from the Rhino Shell, the “print” function will output the given text to standard output with a newline character. As far as I can tell there isn’t a non-newline print command available on the Shell. Annoyingly, when running from Java both print and println are available and tied to their common java behaviors. This means that my suite.js code which uses “print” needs to use “println” when running from Java. My first thought was to override print to execute println from my Java runner, but it looks like these basic top-level functions can’ be redefined from JavaScript.
this.engine.eval("function print(message) { println(message); }");
(no errors at runtime, but didn’t work)
The solution was to use add a level of indirection to my suite.js
var out = (typeof println !== "undefined") ? println : print;
out("FAIL - " + name); // used to be a call to print directly
Now we have suit.js running from Rhino embedded within the Java 6 JDK … but things are perfect. The current code throws “Inappropriate array length” errors for a few QUnit tests. I will be looking into these next.
Make JavaScript tests part of your build: QUnit & Rhino
I know some zealous Asynchronites who don’t believe code exists unless:
- it has tests
- code and tests are in source control
- tests are running on the continuous integration (CI) build
Sound crazy? If so, that is my kind of crazy.
Lately I have been hacking around a lot with JavaScript (HTML5, NodeJS, etc…) and was asked by another team if I had any suggestions on testing JavaScript and how they could integrate it into their build. Most of my experience testing JavaScript has been done by executing user acceptance tests written with tools like Selenium and Cucumber (load a real browser and click/act like a real user). Unfortunately these tests are slow and brittle compared to our unit tests. More and more of today’s dynamic web apps have large amounts of business logic client side that doesn’t have a direct dependency on the browser. What I want are FAST tests that I can run with every single change, before every single commit, and headless on our build server. They might not catch everything, but they will catch a lot long before the UATs are finished.
Goal : Run JavaScript unit tests as part of our automated build
The first hurdle was finding a way to run the code headless outside of a browser. Several of today’s embedded JavaScript interpreters are available as separate projects but for simplicity I like Rhino. Rhino is an interpreter written entirely in Java and maintained by the Mozilla Foundation. Running out of a single .jar file and with a nice GUI debugger, Rhino is a good place to start running JavaScript from the command line. While not fully CommonJS compliant yet, Rhino offers a lot of nice native functions for loading other files, interacting with standard io, etc. Also, you can easily embed Rhino in Java apps (it is now included in Java 6) and extended with Java code.
My JS testing framework of choice lately has been JSpec which I really like: nice GUI output, tons of assertions/matchers, async support, Rhino integration, and really nice r-spec-esque grammar. Unfortunately JSpec works best on a Mac and the team in question needs to support Windows/*nix mainly.
Enter QUnit: simple, fast, and used to test JQuery. Only one problem, QUnit is designed to run in a browser and gives all of its output in the form of DOM manipulations. Hope was almost lost when I found a tweet by John Resig himself that suggested that QUnit could be made to work with a command line JavaScript interpreter. Sadly despite many claims of this functionality, I couldn’t find a single good tutorial which showed me how nor a developer leveraging this approach. A bit of hacking, a lucky catch while reading the Env.js tutorial, and twada’s qunit-tap project came together in this simple solution:
Step 1 : Write a test (myLibTest.js)
Create a simple test file for a even simpler library function.
test("Adding numbers works", function() {
    expect(3);
    ok(newAddition, "function exists");
    equals(4, newAddition(2, 2), "2 + 2 = 4");
    equals(100, newAddition(100, 0), "zero is zero");}
);
Step 2 : Create a test suite (suite.js)
This code could be included in the test file, but I like to keep them separate so that myLibTest.js could be included into a HTML page for running QUnit in normal browser mode without making any changes.
This file contains all of the Rhino specific commands as well as some formatting changes for QUnit. After loading QUnit we need to a do a bit of house work to setup QUnit to run on the command line and override the log callback to print our test results out to standard out. QUnit offers a number of callbacks which can be overridden to integrate w/ other testing tools (find them on the QUnit home page under “Integration into Browser Automation Tools”) Finally load our library and our tests. [EDIT: ADD]
load("../qunit/qunit/qunit.js");

QUnit.init();
QUnit.config.blocking = false;
QUnit.config.autorun = true;
QUnit.config.updateRate = 0;
QUnit.log = function(result, message) {
    print(result ? 'PASS' : 'FAIL', message);
};

load("myLib.js");
load("myLibTest.js");
Step 3 : Write the code (myLib.js)
function newAddition(x, y) {
    return x + y;
}
Step 4 : Run it
Running Rhino is piece of cake but I am VERY lazy so I created a couple of aliases to make things dead simple. (taken from the Env.js tutorial, jsd runs the debugger)
export RHINO_HOME="~/development/rhino1_7R2"
alias js="java -cp $RHINO_HOME/js.jar org.mozilla.javascript.tools.shell.Main -opt -1"
alias jsd="java -cp $RHINO_HOME/js.jar org.mozilla.javascript.tools.debugger.Main"
Once the alias are created, simple run the suite
> js suite.js
> PASS function exists
> PASS <span>2 + 2 = 4</span>, expected: <span>4</span>
> PASS <span>zero is zero</span>, expected: <span>100</span>
>
Step 5 : Profit!
There you go, command line output of your JavaScript unit tests. Now we can test our “pure” JavaScript which doesn’t rely on the DOM. Using a tool like Env.js this is also possible and will be discussed in a future post. [EDIT: ADD]
Step 5+ : Notice the problem -> HTML output on the command line
You may have noticed that my output messages include HTML markup. Sadly QUnit still has assumptions that it is running in a browser and/or reporting to an HTML file. Over the next couple weeks I am going to work on refactoring out the output formatting code from the core unit testing logic and hopefully build out separate HTML, human readable command line, and Ant/JUnit XML output formatters so that integrating QUnit into your build process and Ant tasks is a piece of cake.
Track my progress on my GitHub fork and on the main QUnit project issue report.
[EDIT] I have posted about some of my progress and setbacks here.
Note to self: C# throw; NOT throw ex;
If you need to catch and re-throw the original exception in C# (and possibly other .Net CLR languages) PLEASE, GOD PLEASE, use:
catch(FooException ex) {
// do what you came here to do
throw;
}
NOT:
catch(BarException ex) {
// do what you came here to do
throw ex;
}
While I love being a polyglot developer equally confident developing on the .Net CLR as the JVM, when I am working in a mainstream OO language I still think in Java. Thus my confusion today when I found a several times re-thrown exception’s stack trace only going back as far as the last re-throw. Turns out that explicitly throwing an exception (new or old) sets the originating stack trace location as the point of the throw command, not where the Exception object was created or originally thrown. This is not the same in Java. I like the syntactic sugar implicitly throwing the caught exception, but shouldn’t the behaviors be the same!? Sadly the offending throw anti-pattern is strewn throughout the code I was working with….
** Also, put the damn curly braces on the same line ;-)
*** Several more knowledgeable .Net devs on the team knew this fact, but weren’t 100% sure why; but I found this link which helped.
Mutual Authentication with CLIENT-CERT, Tomcat 6, and HttpClient
M is for Mutual Authentication:
How “it must be simple” turned into “god that was annoying”.
I spent most of today wrestling with getting a JEE webapp running in Tomcat 6 to enforce mutual authentication by using the rarely used CLIENT-CERT authentication. If you love spending your days translating poor error messages and frustrations into Google queries as much as I do, read on for some notes I took along the way. If not, check out this amazing chart over at XKCD.
The mission: lock down a particular action on our web application so that only a single other system could authenticate and invoke it. Also provide an example client application which can access the webapp.
Back story: I have worked with certificates and various forms of authentication before, but never this combination. We want a small subset of the application to only be accessed via SSL with both server and client providing trusted certificates for mutual authentication. The portion of the application will only be accessed by a single other system inside the company intranet.
How it went down: The following are the basic steps to get everything setup in Tomcat 6 and a fairly standard JEE webapp.
- First we need to know who we are, who they are, and make sure we ONLY trust them and no one else
- To do this we need a certificate to identify ourselves. Java’s provided keytool.exe provides an easy way to create a self signed certificate within a keystore. Keytool can also help us export our public certificate out of our keystore. This should also be done for the client.
- Next import the public certificates into a new truststore for the opposite system (A only trusts B and B only trusts A). Keytool to the rescue again.
- Note: Java keystore files and certs of in a different format than the PKCS12 files that can be created by OpenSSL
- Next configure a Tomcat to support SSL communication
- Add a new connector to thees server.xml configuration specifying HTTPS, the SSL protocol, where the webapp’s keystore and truststores are, etc
- <Connector className=”org.apache.coyote.tomcat4.CoyoteConnector”
port=”8443″ enableLookups=”true”
acceptCount=”100″ connectionTimeout=”20000″
useURIValidationHack=”false” disableUploadTimeout=”true”
scheme=”https” secure=”true” SSLEnabled=”true”
keystoreFile=”ourApp.keystore” keystorePass=”changeit”
truststoreFile=”ourApp.truststore” truststorePass=”changeit”
clientAuth=”false” sslProtocol=”TLS”
/> - Note: clientAuth can have 3 values
- True – all connections through this connector require client authentication
- Want – the web app will ask for authentication but not require it
- False – connections do not require client authentication UNLESS the web app specifies it is required via a security constraint with CLIENT-CERT chosen (this is the one we want)
- Configure a new user with the required security role in the tomcat-users.xml if the in-memory realm is used
- <role rolename=”secureconn”/>
- <user username=”CN=TheirApp, OU=Unknown, O=Unknown, L=Unknown, ST=Unknown, C=Unknown” password=”null” roles=”secureconn”/>
- Configure out web.xml to use a CLIENT-CERT authentication constraint for our action
- <security-constraint>
<web-resource-collection>
<web-resource-name>Demo App</web-resource-name>
<url-pattern>/secure/*</url-pattern>
</web-resource-collection>
<auth-constraint>
<role-name>secureconn</role-name>
</auth-constraint>
</security-constraint><login-config>
<auth-method>CLIENT-CERT</auth-method>
<realm-name>Demo App</realm-name>
</login-config><security-role>
<role-name>secureconn</role-name>
</security-role>
- <security-constraint>
- Create a client to hit the application
- Here we used the Apache Commons HttpClient (3.x b/c of client restrictions)
- Several pages talk about various ways to add security protocols to HttpClient code but the examples are left lacking and most point to the AuthSSLProtocolSocketFactory class which for some reason is not present int he 3.x binaries but IS present in the 3.x SRC bundles.
- ** I will include some sample code tomorrow ….
- Test things using Firefo
- You can add a personal certificate to identify yourself through Firefox’s preferences -> Advanced -> Exncryption
- Firefox uses PKCS12 certificates which can be created easily from scratch through a few OpenSSL commands or from an existing keystore certificate through one hairy keytool command
- ** I will include the commands and a couple links tomorrow …..
Hopefully these notes will help someone in the future with getting things setup correctly. When I started this morning I couldn’t find an end to end example to build on.
Edit: Huge thanks to Matt Todd for helping me with this. You can check out his blog at: http://emergentdevelopment.blogspot.com/ .
mario math – part 2
To calculate Mario’s position with KEY_RIGHT pressed down continuously for n frames:
let 
at frame 1:

at frame 2:
![\begin{align} & v_2 = a(.89) + a \\ & p_2 = a + [a(.89) + a] \end{align}](https://twoguysarguing.files.wordpress.com/2009/08/pcalc_eqn3.png?w=720)
at frame 3:
![\begin{align} & v_3 = (a(.89) + a).89 + a \\ & p_3 = a + [a(.89) + a] + [(a(.89) + a).89 + a] \end{align}](https://twoguysarguing.files.wordpress.com/2009/08/pcalc_eqn4.png?w=720)
at frame 4:
![\begin{align} & v_4 = ((a(.89) + a).89 + a).89 + a \\ & p_4 = a + [a(.89) + a] + [(a(.89) + a).89 + a] + [((a(.89) + a).89 + a).89 + a] \end{align}](https://twoguysarguing.files.wordpress.com/2009/08/pcalc_eqn5.png?w=720)
If you multiply everything through, a pattern starts to emerge:

So we can say that in general, Mario’s position after n frames will be:
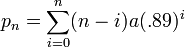
But we’d like a formula we can evaluate in O(1), so massaging the equation a bit we get:

Both of sums in the above equation, we have identities for:
 and
and 
Of which the second one is kind of convoluted, but allows us to come up with:

Which can then write in Java as:
public float positionAfter(float accel, int nFrames) {
    float term1 = n * (1 - Math.pow(.89, nFrames + 1)) / .11;
    float term2 = (Math.pow(.89, nFrames + 1) * (-.11 - 1) + .89) / .2079;
    return a * (term1 - term2);
}
The (.89) term is friction (I think?) and on the ground the code uses that value. In the air, the dynamics and equations are the same, but use a different coefficient of friction: (.85). The initial acceleration of a jump is vastly different, though, so I’ll tackle that in the next Mario Math installment.
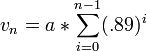
mario math
To calculate Mario’s velocity, with KEY_RIGHT pressed down continuously for n frames:
let  (1.2 if KEY_SPEED is held down as well)
at frame one, then, your velocity 
frame 2: 
frame 3: 
frame 4: 
which, if you multiply through, looks like this:

Which makes it a bit easier to generalize Mario’s velocity at any frame n:

we know from paying attention in high school wikipedia that:

however, our sequence only goes to n-1 frames. It’s missing the last term:

subtracting xn from both sides


which we could have maybe figured out faster if we had remembered this identity:

replacing the lower m with 0 and upper n with n-1 we get:


which multiplied by  is what we found earlier.
and so mario’s velocity after n frames of acceleration is:

which can be calculated in constant time by this Java function:
public float velocityAfter(float accel, int nFrames) {
    return accel * ((1 - Math.pow(0.89, nFrames)) / 0.11);
}
Whew.
Thanks to Heath Borders and my co-blogger Ben for working this out on a whiteboard with me.
tour de mario – jumping
My co-blogger Ben and I are working on an entry for the Mario AI Competition 2009. The idea is to develop a Java program that simulates button presses to guide Mario through randomly generated levels of increasing difficulty. The competition is aimed at exploring Artificial Intelligence methods in gaming, but before Ben and I can even get to that, I think a short tour of the code we will be working with is in order.
Jumping is key in Mario. Maybe more precisely, landing is key. Controlling where you land will stomp an enemy or clear a gap. Jumping is easy, landing is hard.
Since this is so integral, let’s take a look at the code that makes Mario tick.
The class ch.idsia.mario.engine.sprites.Mario controls Mario’s behavior.
The tick() method of Mario’s superclass, Sprite is called once for every frame of the game, 24/sec. tick() is pretty simple, it just calls move(), which Mario happens to implement.
The move() method has a lot of code in it — 224 lines — but at it’s core, it just sets the xa and ya variables — x-acceleration and y-acceleration — and then uses them to increment Mario’s current x and y position variables.
move() starts on line 156, but doesn’t start doing anything we’re interested in until line 211:
float sideWaysSpeed = keys[KEY_SPEED] ? 1.2f : 0.6f;
Mario moves horizontally at a rate 0.6 per frame at normal speed and 1.2 when the SPEED key is pressed.
The jumping code starts on line 234. I’ve left out the conditions we don’t care about:
if(keys[KEY_JUMP] || ...) {
    ...
    if(onGround && mayJump) {
        xJumpSpeed = 0;
        yJumpSpeed = -1.9f;
        jumpTime = 7;
        ya = jumpTime * yJumpSpeed;
        onGround = false;
        sliding = false;
    }
    ...
    else if(jumpTime > 0) {
        xa += xJumpSpeed;
        ya = jumpTime * yJumpSpeed;
        jumpTime--;
    }
}
This is the heart of the jump. jumpTime is a frame counter variable, and a jump lasts 7 frames. I’m not positive, but I think that the y-origin is in the upper right of the screen, hence the negative yJumpSpeed. After 7 frames, jumpTime is reset to 0.
There are extra bits of code that limit Mario’s maximum acceleration to 8, cut Mario’s xa and ya to 85% of their value and every frame that Mario isn’t on the ground his y-acceleration is is decreased by 3.
        ya *= 0.85f;
        if (!onGround) {
            ya += 3;
        }
But it’s enough to figure out where you’re going to land.
Update
I made a couple of mistakes, which are crossed out above, and besides the mention of sideWaysSpeed I didn’t mention anything about horizontal speeds. As you can see above, when you are in the air xJumpSpeed starts out as 0 and you don’t gain any acceleration from it for the duration of your jump. The code that sets your horizontal acceleration regardless of whether you are on the ground or not is at line 288:
        if (keys[KEY_RIGHT] && !ducking) {
            if (facing == -1) sliding = false;
            xa += sideWaysSpeed;
            if (jumpTime >= 0) facing = 1;
        }
which merely sets your acceleration depending on what direction you are pressing.
Custom Continuum Notifier – Step 2: Build a dummy notifier
Now that we have Continuum building without any problems, the next step is getting a basic notifier coded up and Continuum aware of it.
The Continuum user wiki makes this process seem simple enough: create a new notifier extending AbstractContinuumNotifier and register the new notifier in application.xml. Essentially, this is true … with a few minor modifications.
- Create your new notifier project
- Under the continuum-notifiers Maven module, create a new module called continuum-notifier-web as a standard Maven project (or dupe one of the existing ones)
- Modify the new module’s pom.xml to have continuum-notifiers as its parent and add the continuum-notifier-api artifact as a dependency
<project ...>
<parent>
 <artifactId>continuum-notifiers</artifactId>
 <groupId>org.apache.continuum</groupId>
 <version>1.2.3</version>
 </parent>
 <modelVersion>4.0.0</modelVersion>
 <artifactId>continuum-notifier-web</artifactId>
 <name>Continuum :: web-Dashboard</name>
 <dependencies>
 <dependency>
 <groupId>org.apache.continuum</groupId>
 <artifactId>continuum-notifier-api</artifactId>
 <version>1.2.3</version>
 </dependency>
 </dependencies>
</project>
- Add the new sub-module to the continuum-notifiers parent pom.xml.
<modules>
 <module>continuum-notifier-api</module>
 <module>continuum-notifier-irc</module>
 <module>continuum-notifier-jabber</module>
 <module>continuum-notifier-msn</module>
 <module>continuum-notifier-wagon</module>

 <module>continuum-notifier-web</module>
 </modules>
- In your new project, create a basic notifier that simply logs that it was called. This class should extend AbstractContinuumNotifier and implement getType() and sendMessage():
package org.apache.maven.continuum.notification.atkpwadashboard;

import org.apache.maven.continuum.notification.AbstractContinuumNotifier;

import org.slf4j.Logger;
import org.slf4j.LoggerFactory;

public class WebNotifier extends AbstractContinuumNotifier {
 private Logger log = LoggerFactory.getLogger(getClass());

 public String getType() {
 return "web";
 }

 public void sendMessage(String messageId, MessageContext context)
 throws NotificationException {
 log.info("Web Notifier has been called!");
 }
}
- Build your new module either by a full build of Continuum or by just building your sub module (mvn package).
- Deploy your new notifier
- Copy the newly created notifier .jar into your Continuum intallation at <CONTINUUM_BASE_DIR>/apps/continuum/WEB-INF/lib/continuum-notifier-web.jar
- Modify <CONTINUUM_BASE_DIR>/apps/continuum/WEB-INF/classes/META-INF/plexus/application.xml to register the new notifier by adding the following code:
<component>
 <role>org.apache.maven.continuum.notification.Notifier</role>
 <role-hint>web</role-hint>
 <implementation>org.apache.maven.continuum.notification.atkpwadashboard.WebNotifier</implementation>
 </component>
- Restart Continuum
- On one of your managed applications, modify the pom.xml to use the new notifier:
<ciManagement>
 <system>continuum</system>
 <url>http://localhost:8080/</url>
 <notifiers>
 <notifier>
 <type>web</type>
 </notifier>
 </notifiers>
 </ciManagement>
- Profit.
Things to note:
- Continuum uses Plexus for its dependency injection. Since your notifier is extending AbstractContinuumNotifier which has dependencies, you MUST register your notifier as needing these inject or you will see some lovely and confusing NullPointerExceptions when you try to use the notifier.
- Technically you don’t need to get Continuum to compile to build a new notifier, but having the source handy and being able to see how the rest of the project is structured helps.
- I haven’t figured out how to get Continuum builds to auto install my notifier yet …. it is on my to-do list.
- To simplify creating the new project, I just copied continuum-notifier-jar and made modifications as necessary.
- The email notifier is called “mail” and is in the continuum-core module.
Big Frustrating Gotcha: Continuum’s notifier plugin architecture only extends to the internals of Continuum but does NOT include any of the web-app’s GUI. This means that your new notifier will not show up in any of the admin screens as an option, or have any edit/configuration screens a web user can see. These GUI elements are managed in the continuum-core and continuum-web-app modules, separate from the notifier code themselves. For what I was doing I didn’t need this, but it would have been nice. It looked to be fairly simple to add the new notifier to the approrpiate .jsp’s and have full graphical interface power.
Helpful Links:
- Continuum user wiki page on building a notifier
- Email chains one and two talking about doing the same thing
- Configure your notifier in the application.xml wrong and you might get an error like this
Last step is to make the notifier actually do something related to build ….
Custom Continuum Notifier – Step 1: Get Continuum to Compile

This past week I was charged with creating a custom Continuum notifier which would push a build’s Selenium TestNG test results to a second system for reporting. Changing project priorities, distractions, poor documentation and some weird issues made this simple task take much longer than it should have. Hopefully, this series of posts will help make the process just a little bit smoother for the next person.
Background
Visibility into the quality of a software project is crucial to delivering a top notch product. One direct way to achieve this is monitoring the team’s UAT results over time. I have been slowly pushing the client’s development teams to fully automate their user acceptance testing along side the rest of their build process. Enter Continuum and Maven, the client’s choices for continuous integration and “one button” builds. Out of the box, Continuum had pretty much everything we needed from a testing/reporting standpoint, except that the development teams were spread out across several Continuum installations and management wanted a single place to see ALL teams’ test results. Luckily, I found that Continuum has a plugin architecture for its notifiers – the plugins which decide what to do with the builds’ results. Out of the box, Continuum comes with the ability to email and/or IM your build results in several ways. What I needed was a notifier that would send the testng-results.xml file generated by Maven’s surefire testing plugin via a multi-part HTTP POST request to our reporting app. Sounded simple enough.
Use the Source Luke
A few quick Google searches taught me a couple things: 1) a number of people have wanted to to do exactly what I needed, and 2) there didn’t seem to be any good end-to-end documentation on how to do it. First step, download the source and get it to compile. Next, according to the directions on the main site and the user wiki, was a simple mvn install.
First Build – Fail
Unfortunately, the continuum-release module’s tests fail. I am still looking into why the release module tries to do a SVN commit during a install of the main project and not a deploy, but for the time being, it fails. In order to get past the release module’s issues (the other modules install just fine and pass their tests) I sinned and added a -Dmaven.test.skip=true to the build and continuum-release installed like a champ.
Second Build – I forgot
Boom! Not so fast. OutOfMemoryError from maven while building the web module. Setting MAVEN_OPTS to increase the max heap memory Maven has fixed the problem.
Third Build – Fell off the log
Boom! Again. java.lang.NoClassDefFoundError on Commons Logging coming from the JSPC plugin (precompiling JSPS). It turns out that plugins live in the same classloader as Maven itself and the JSPC plugin requires commons logging. It also turns out that in the latest version of Maven (2.2.0) the internal dependencies changed and the version JSPC is no longer included in Maven’s “uber” .jar. Fix? Dropped 1.1.1 commons logging three .jars into Maven’s lib folder. Fixed.
Fourth Build – Houston, We Have Compilation
Finally, everything compiled and installed without problems. Next up, writing a dummy notifier and getting Continuum to use it.


4 comments